Linux Server Management Guide
Reset Linux
-
Easily, just download UltraIso and the needed version of Ubuntu
UltraIso download link:UltraISO - The Ultimate ISO CD/DVD Image Utility
Ubuntu download link:Download Ubuntu Desktop | Download | Ubuntu
-
Then, you should Burn ISO images to CD/DVD or USB drive
-
Last, you just shut down the Linux server and reboot.
-
When the Linux reboots, you should try to Enter F2/F12 to enter the BISO mode.
-
choose the USB to boot.
-
Finally, you can start installing the Ubuntu system.
Install ssh
sudo apt-get install openssh-server
Reset cuda&cudnn
Do it by yourself. I just found a link for you. You can follow it. But it may not work.
Ubuntu20.04下配置Nvidia显卡驱动+CUDA+CUDNN
How to save your time when you are a server administrator
Add new user
adduser user_name
Become a sudoer
You must be sudoer first. So that you can use the command below to become a sudoer.
usermod -aG sudo user_name
su
vim /etc/sudoers
# add the code below
username ALL=(ALL:ALL) ALL
Open/Shut graphic interface
To make the GPU memory cleaner. (= =)
init 3 # shut graphic interface
init 5 # open graphic interface
Mount disk
I’m not quite sure about this command because I did it one and a half years ago. So I give you some references below.
# 1.see the mounted disk
df -h
    Filesystem      Size  Used Avail Use% Mounted on
    tmpfs           6.3G  2.2M  6.3G   1% /run
    /dev/sda2       1.8T   38G  1.7T   3% /
    tmpfs            32G     0   32G   0% /dev/shm
    tmpfs           5.0M     0  5.0M   0% /run/lock
    /dev/sda1       511M  5.3M  506M   2% /boot/efi
    tmpfs           6.3G   80K  6.3G   1% /run/user/127
    tmpfs           6.3G   68K  6.3G   1% /run/user/1001
    tmpfs           6.3G   68K  6.3G   1% /run/user/1000
    /dev/sdc1       1.8T   24K  1.7T   1% /mnt/sdc
# 2.see all the disk include unmounted
lsblk
    sda      8:0    0   1.8T  0 disk
    ├─sda1   8:1    0   512M  0 part /boot/efi
    └─sda2   8:2    0   1.8T  0 part /
    sdb      8:16   0 223.6G  0 disk # unmounted disk
    ├─sdb1   8:17   0   3.8G  0 part # unmounted part
    ├─sdb2   8:18   0     1K  0 part # unmounted part
    ├─sdb5   8:21   0  30.5G  0 part # unmounted part
    ├─sdb6   8:22   0 132.5G  0 part # unmounted part
    └─sdb7   8:23   0  56.8G  0 part # unmounted part
    sdc      8:32   0   1.8T  0 disk # unmounted disk
    └─sdc1   8:33   0   1.8T  0 part # unmounted part
# 3.see extractly
fdisk -l | grep "sd[bc]"
    Disk /dev/sdb: 223.57 GiB, 240057409536 bytes, 468862128 sectors
    /dev/sdb1  *         2048   7999487   7997440   3.8G 83 Linux
    /dev/sdb2         8001534 468860927 460859394 219.8G  5 Extended
    /dev/sdb5         8001536  71999487  63997952  30.5G 82 Linux swap / Solaris
    /dev/sdb6        72001536 349802495 277800960 132.5G 83 Linux
    /dev/sdb7       349804544 468860927 119056384  56.8G 83 Linux
    Partition 2 does not start on physical sector boundary.
    Disk /dev/sdc: 1.82 TiB, 2000398934016 bytes, 3907029168 sectors
    /dev/sdc1        2048 3907028991 3907026944  1.8T 83 Linux
# 4.mount
mkdir /mnt/sdc1
mount /dev/sdc1 /mnt/sdc1
# 5.automatically mount
vim /etc/fstab
# and add the content below
/dev/sdc1 /mnt/sdc auto defaults,nofail,comment=cloudconfig 0 2
/dev/sdb6 /mnt/sdb6 auto defaults,nofail,comment=cloudconfig 0 2
/dev/sdb7 /mnt/sdb7 auto defaults,nofail,comment=cloudconfig 0 2
# 6.check if it works
sudo mount -a
# 7.umount a disk
sudo umount /dev/sdb1
# 8.mkfs
sudo mkfs.ext4 /dev/sdb
	mke2fs 1.46.5 (30-Dec-2021)
    Found a dos partition table in /dev/sdb
    Proceed anyway? (y,N) y
    Discarding device blocks: done
    Creating filesystem with 58607766 4k blocks and 14655488 inodes
    Filesystem UUID: 1e51f436-77d6-4dac-8807-937e9d566173
    Superblock backups stored on blocks:
            32768, 98304, 163840, 229376, 294912, 819200, 884736, 1605632, 2654208,
            4096000, 7962624, 11239424, 20480000, 23887872

    Allocating group tables: done
    Writing inode tables: done
    Creating journal (262144 blocks): done
    Writing superblocks and filesystem accounting information: done
# 9.mount
mount /dev/sdb /mnt/sdb
# 10.automatically mount
vim /etc/fstab
/dev/sdb /mnt/sdb auto defaults,nofail,comment=cloudconfig 0 2
Check disk usage
# 查看每个用户占用
sudo du -sh /home/*
# 查看磁盘占用
df -hl
# 查看用户进程
ps -aux
# 查看单个文件夹下的文件占用
du -lh --max-depth=1
Some server-related trivia
3090ti*4
该服务器是最多人使用的(因为性能优于其他服务器),位置为1楼的机房,进入需要向机房管理人员申请然后才可以进入。
该服务器
1080ti*3
该服务器位置为609。
在重启的时候需要手动进入BIOS,否则会无法进入界面导致乱码。
Tips:启动盘为三星的启动盘,其他启动盘可能是不对的。
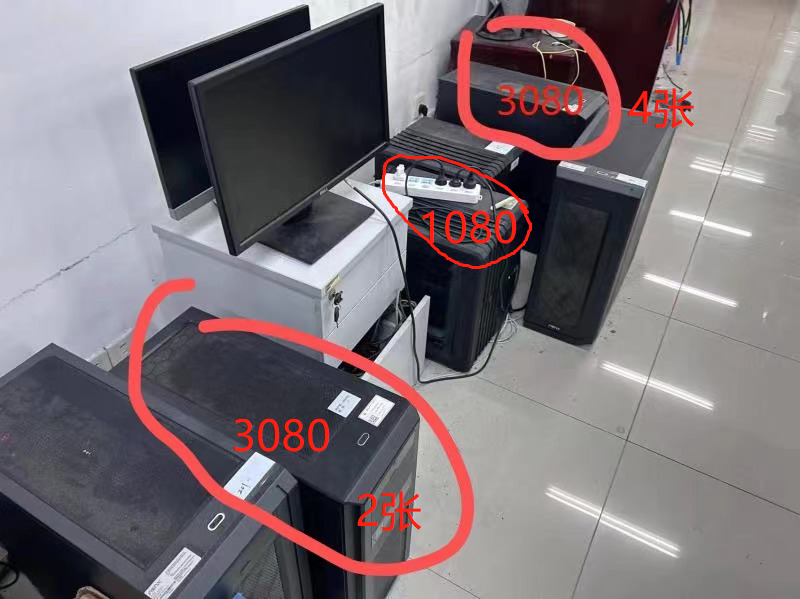
3080ti*4
该服务器位置为609。
在重启之后需要手动按一下键盘才能够使用,所以在重启之后请耐心等待5-10mins,然后按一下键盘。
Tips:如果有空可以自己解决一下这个问题,让服务器重启之后自动进入系统。
3080ti*2
该服务器维修了3次,位置为609。
并且为上海服务商,所以如果维修需要联系上海的维修人员。
titan*2
该服务器为本人自行重装的系统,位置为407,进入该实验室需要用户名和密码。
2070*2
该服务器处于问题状态,无法联网使用。位置为609。
Location pictures
以下是 N609 的服务器的位置。
以下是 3090 服务器的位置。
1.位置位于信工楼N105,也就是进门的右拐角就有一个机房
2.怎么进去:找N608一个戴眼镜的老师然后让他帮忙开门
3.具体3090位置,如下图,首先进门,然后右手边第一排就是服务器的位置,然后找到网络机柜25,就是我们服务器的位置
4.有时候连接不上可能是因为服务器进入了休眠状态,重新按一下开机键,不需要长按就可以退出休眠
Some useful commands to fix bugs
Could not ssh, maybe network problem
# 0. check the ping, ssh to ensure the network work properly
ping server_ip_addr # if don't work then try to fix the network
ssh username@server_ip_addr # if don't work then try to fix ssh and ufw
# 1. check the firework
sudo ufw status
# 2. check the ssh
sudo ufw allow ssh
How to fix GPU fan ERR!
这个问题产生的原因实在太多了,建议就是先重启,不行的再尝试其他解决方案或者返修。
# just one solution
reboot
You are required to change your password immediately (password aged), You must change your password now and login again!
这个问题出现的原因不明,解决方案如下(如果你不是管理服务器的人员,请咨询管理服务器的人进行操作):
# 0.需要登录自己的账号,并修改为强密码,以下是一个可以获取强密码的网页
# 记得多试几次,密码长度10-15
https://tool.ip138.com/random/
# 1.登录上之后改为root账号
su
# 2.为用户的密码设置加上期限
chage -M 99999 username
# 3.修改用户强密码为其他密码
passwd username
# 4.改为登录自己的账号
su username
Failed to initialize NVML: Driver/library version mismatch
版本不匹配问题,因为服务器自动更新导致,解决方案如下:
# 检查服务器的内核版本
cat /proc/driver/nvidia/version
NVRM version: NVIDIA UNIX x86_64 Kernel Module  535.129.03  Thu Oct 19 18:56:32 UTC 2023
GCC version:  gcc version 9.4.0 (Ubuntu 9.4.0-1ubuntu1~20.04.3)
# 上面可以看到是 535.129.03 = driver_version
modinfo nvidia
# 一般在version行会输出不一样的驱动,所以就会导致问题,就算一样
# 也问题不大,删掉就完事
# 删除之前的东西
sudo /usr/bin/nvidia-uninstall
sudo apt-get --purge remove nvidia-*
sudo apt-get purge nvidia*
sudo apt-get purge libnvidia*
# 看看输出
sudo dpkg --list | grep nvidia-*
# 解决方法是去官网查找对应的驱动
https://www.nvidia.cn/geforce/drivers/results/213200/
# 下载之后传送到服务器,并赋予权限
sudo chmod a+x NVIDIA-Linux-x86_64-driver_version.run
# 重装,一路回车
sudo ./NVIDIA-Linux-x86_64-driver_version.run
# 然后应该就活过来了
Update disable
# 将下面的配置全部设置为0
vim /etc/apt/apt.conf.d/10periodic
# 将下面的配置也全部设置为0
vim /etc/apt/apt.conf.d/20auto-upgrades
# 重启
Unable to determine the device handle for GPU 0000:4C:00.0: Unknown Error
这个问题导致的原因很难确定:
# 查看显卡状态
nvidia-debugdump --list
# 以下为显示内容
Found 2 NVIDIA devices
        Device ID:              0
        Device name:            NVIDIA TITAN Xp   (*PrimaryCard)
        GPU internal ID:        0323917060372

Error: nvmlDeviceGetHandleByIndex(): Unknown Error
FAILED to get details on GPU (0x1): Unknown Error
显然是 1 卡坏了,一个最简单的方式就是停用 Bus_Id 为 0000:4C:00.0 的显卡:
# drain 为停用模式, -p 指定显卡的Bus_Id, -m 启动停用模式
sudo nvidia-smi drain -p 0000:4C:00.0 -m 1
但是这只是一个权宜之计,并不能修复问题。